Nobody warns you about the pickup problem!
The shop calls. The car is ready. You’ve been waiting two days, maybe three. You arrive, the car is sitting there looking clean, and there’s a quiet social pressure to be happy about it, say thank you, hand over the balance payment, and drive away feeling like you’ve made a smart investment. That social pressure has cost a lot of people a lot of money.
A PPF installation flaw that’s caught before you leave the studio is the installer’s problem to fix, at their cost, before you take possession. The same flaw discovered two weeks later, after the car has been washed and driven, is a negotiation and frequently an expensive one, particularly if the film needs to be removed and reapplied.
Twenty minutes and this checklist before you sign off could prevent months of frustration. Here’s exactly what to inspect!
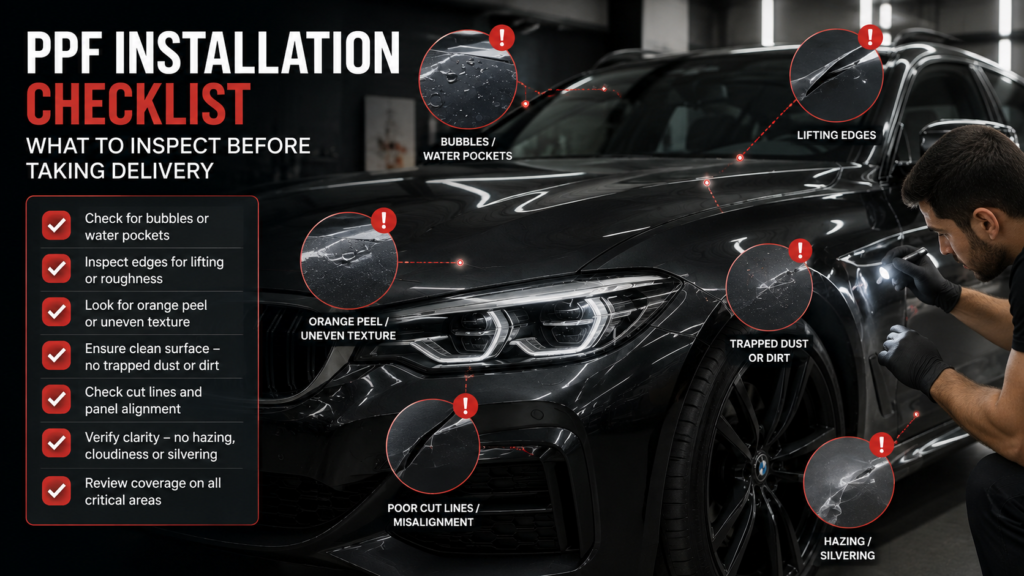
Step 1: Demand the Right Lighting Before You Look at Anything
This is the step most people skip because it feels awkward to ask. Don’t be shy; ask anyway.
Request that the car be rolled into direct sunlight or positioned under the studio’s brightest overhead lights before you begin the inspection. A dim workshop is the worst possible environment for a PPF quality check; it hides bubbles, contamination, and lifting edges that are immediately obvious in natural or bright artificial light. A studio that’s confident in its work will accommodate this without hesitation. If there’s resistance, that itself is information worth noting.
Step 2: Run Your Fingertip Along Every Edge
Walk the full perimeter of the car slowly: bonnet edges, bumper lips, fender edges, mirror caps, door edges, A-pillar. At each edge where film meets exposed paint or panel, run the pad of your fingertip along the transition. You should feel nothing. A well-installed film is tucked or wrapped so that the transition is physically imperceptible. What you’re checking for is a raised lip, a ridge where the film was trimmed flush rather than properly finished, or corners that are already beginning to lift.
Pay particular attention to the front bumper; it has the most complex geometry of any panel and is where installation shortcuts are most likely to show up. Lifted edges don’t stabilise on their own. They accumulate debris, moisture, and road contamination underneath, and that accelerates into larger peeling within weeks.
Step 3: Check for Bubbles and Know Which Kind
Position yourself at each panel and view the film surface at a shallow angle in your inspection lighting. You’re looking for anything that breaks the smooth surface plane.
Small water bubbles immediately after installation are expected; the adhesive is still hydrating, and they will resolve within 24 to 48 hours as the film cures. The studio should tell you this proactively. What you don’t want to see are large air bubbles, clusters of bubbles near any edge, or bubbles that the technician hasn’t flagged as temporary. If you’re unsure whether a bubble is air or water, press it gently. An air bubble feels hollow and springs back. A water bubble has slight resistance and may shift position. When in doubt, ask the technician to demonstrate on the spot, or request a 48-hour window before final payment; a confident installer won’t object.
Step 4: Assess the Film’s Optical Clarity
The film on your car should be effectively invisible. In direct light, look across each panel for:
Cloudiness or haziness anywhere on the surface. A milky or silvery appearance along the border areas. A pronounced texture that wasn’t present on your original paint. Any slight yellowing quality. Thermoplastic polyurethane film is optically clear and should remain so for years.
If any of these are present on day one, they are not going to improve.
Step 5: Inspect the Cut Lines
Every installation has cut lines, the points where the film was trimmed to fit. These are normal and unavoidable. What they should be is precise, straight, and logically positioned along natural panel contours, door shut lines, or other areas where they’re least visible at normal viewing distances.
What you don’t want to see: ragged or inconsistent cuts, lines running across the open face of a panel for no apparent reason, or evidence that two separate pieces of film were joined where a single piece should have been used. Compare equivalent panels on both sides of the car; the cut line position should be essentially mirrored.
Step 6: Look for Trapped Contamination
Under bright, raking light, look carefully at the film surface from a low angle. You’re looking for small dots, specks, or fine bumps sitting beneath the film particles that were on the paint surface during installation and are now permanently locked in.
A small number of extremely fine particles are considered within industry tolerance. Visible contamination spread across a panel, particularly on the bonnet where environmental exposure during installation is greatest, is a legitimate basis for requesting the panel to be reapplied.
Step 7: Confirm Panel Alignment and Coverage
The film on corresponding panels should be mirror images of each other. The coverage area on the left front fender should match the right. The cut line placement on the left door should correspond to the right. If coverage is significantly inconsistent between panels, you may not have received the protection area you paid for, and it indicates a lack of process discipline that likely shows up in other ways too.
Step 8: Verify Your Warranty Documentation in Writing
Before the keys change hands: ask for your warranty documentation. This should specify the exact product name and grade installed, the warranty duration and what it covers, and whether the warranty is backed by the installer, the manufacturer, or both.
A manufacturer warranty is only valid when the installation is performed by an authorised studio; ask for confirmation of this status in your documentation. A verbal warranty from an unverified shop is, practically speaking, a promise with no mechanism for enforcement.
A studio that does quality work will typically walk you through much of this before you even pull out this list; it’s a sign that they stand behind what they’ve done. If you’re doing all the prompting, and the technician is visibly uncomfortable, trust that feeling.
At Prime Car Care, every delivery includes a walkthrough inspection with the client before the car leaves our studio. Book your installation: primecarcare.in/contact